A little over a month ago, I made the decision to go back into business for myself as Carol Beck Interiors. Woohoo!! What a ride the past few weeks have been! So why did I do it? Well, it's that "now or never" thing that had been nagging at me. A girl's gotta do what a girl's gotta do...
Here's what's been keeping me busy...
I had been working on this small sitting room for some time, with these fabrics having been selected, and the grass cloth below having been put in the back of the book shelves. A chaise in the Manuel Canovas fabric will soon be delivered, with a pillow in the silk suzanni, and the geometric (finally off back-order) is currently being put on two gorgeous chairs...
Today, I brought my client this rug sample, and I think it is a great solution to the need for something to keep the room monochromatic, with a small scale pattern. (You know computer colors are always a little wonky.)
After that, we move on to tables and accessories. (I always try to respect the pace at which my clients wants to get things done.)
On another front, I had done the drapes and roman shades in another client's dining room two years ago, and now they are tackling the adjacent sitting room. Here's the dining room...
With a roman shade in the inset long window...
I had done their living room maybe four years ago, and I think it's still looking pretty fresh...
So, when they called me to handle this sitting room space, I was thrilled. I love working with this couple, they make my job so easy...
Their first priority is grass cloth on the walls and window treatments. Here's what's been approved...
My plan is to bring a mix of blues with some subtle coral accents into this space in the furnishings. On this wall below, it will be roman shades in the same fabric, and I'm looking for the perfect bar cart or cabinet...
Can you see it? I say I respect my client's pace, but inside, I'm dying to get it all done and see it come together, no matter what the project ;-)
Off the sitting room is the newly renovated kitchen (they did a kick-butt job, on their own, with the finishes). We've decided on the fabrics below for the windows -- the embroidery on cornices and the sheer on the slider (if they decide to do the sheer, which they initially wanted, I will be custom staining a traverse rod to coordinate with the cornice of the sink, and nixing the slider cornice).
On yet another front, I found this gorgeous chest for a client's foyer, which will compete with an antique I found this week, and I can't wait to see what she thinks of these pieces.
In addition to client work, I've been working on new pillows in designer fabrics for 6 Wilson, my home accessory shop on etsy, along with collecting some one of a kind pieces to offer in the near future.
I want to thank all of you who have followed me, both as clients and readers, as I have moved from blog to blog and place to place. It really means a lot. I love what I do, and I hope to continue to share that passion for a long time ;-)
In the coming weeks, I will be tweaking the blog (it's not perfect yet, but if I waited you'd never hear from me!), sharing my design life and whatever moves me along the way!
Talk to you soon,
Carol
Showing posts with label Window Treatments. Show all posts
Friday, June 21, 2013
Monday, January 9, 2012
Sneak Peek and An Ode to Orange
Back in August (it really can't be that long, blogger is lying I'm sure), I did a quick post about some orange fabric I was going to use in my daughter's room. Here's a peek at the window treatments I just completed and installed for her this past weekend...
I'm particularly excited about the blue buttons/tufting I did to tie in the wall color. (Yes, that's a pat on my own back. Can't help it. I get so excited!) The rest of the room is still in progress, and at the rate I'm going, maybe you'll see the rest in May! Oh man, I hope not!
On another note, who knew back in August that Pantone would declare 2012's color of the year as Tangerine Tango.
Maybe I should go into the business of predicting Pantone's colors! (Hardy lol.) Remember this post where I showed my office nook in progress with my wing chair (that I'd reupholstered the previous year) in 2011's color of the year, Honeysuckle, before it was hot? (Pat, pat on the back. Shameless. I know.)
Are you in or out on my favorite color of all time? (That would be orange, my personal signature color.)
Talk to you soon,
Carol
I'm particularly excited about the blue buttons/tufting I did to tie in the wall color. (Yes, that's a pat on my own back. Can't help it. I get so excited!) The rest of the room is still in progress, and at the rate I'm going, maybe you'll see the rest in May! Oh man, I hope not!
On another note, who knew back in August that Pantone would declare 2012's color of the year as Tangerine Tango.
Maybe I should go into the business of predicting Pantone's colors! (Hardy lol.) Remember this post where I showed my office nook in progress with my wing chair (that I'd reupholstered the previous year) in 2011's color of the year, Honeysuckle, before it was hot? (Pat, pat on the back. Shameless. I know.)
Are you in or out on my favorite color of all time? (That would be orange, my personal signature color.)
Talk to you soon,
Carol
Friday, January 6, 2012
Custom Drapes for Sale
I'm doing a wee bit of redecorating. My dining room. New wallpaper that takes my breath away. So naturally, new drapes are part of the package. Naturally? Yes. If you are a window treatment nut like me. (Okay, obsessive is a better word, I admit it.)
I actually love my current drapes, on display below amongst the Christmas bling. They are Fabricut Topaz in the color Duck Egg. They are available with or without the valances.
One pair is a width and a half per panel, the other pair is one width panels. Here is a close up for true color...
They are 84" long, have custom 1 1/2" side hems...
Bottom hems are 4", and they are lined and interlined for lushness...
And the header on them is a nice clean cartridge pleat (actually, no pleating at all) for a more modern look. The image below is taken with them hanging on a rod next to some woven wood shades. Without the valances, they can go in any decor.
Measurements -- The long valance is 90"W x 15"L. (my window is 63"w). The shorter valance is 46"W x 15"L (my window is 37"w). The length of the drapes is a standard 84".
They were done three years ago, with a price tag of about $1,500. I'm asking $450 for all if, or if someone is wanting just the drapes, $350, or make me an offer on what you might want. I can break it all up if necessary. Oh, and you can see from the trim that it is raspberry, cream, blue green, a smidge of olive green, and beigey gold -- very current, yet classic colors. Shipping will be additional, but if you are local (Massachusetts or Rhode Island, we can arrange a pick up).
Don't be intimidated by the sizes. The drapes on the long window would be perfect for a slider, for example.
Email me by clicking on the little blue envelope in the green bar at the end of the post if you are interested, or just want more info. Or just email me at HouseandHomeDefined@gmail.com. They need to go to a nice home!! Maybe to your friend's house, or your mother's?
Thanks for reading and talk to you soon,
Carol
I actually love my current drapes, on display below amongst the Christmas bling. They are Fabricut Topaz in the color Duck Egg. They are available with or without the valances.
One pair is a width and a half per panel, the other pair is one width panels. Here is a close up for true color...
They are 84" long, have custom 1 1/2" side hems...
Bottom hems are 4", and they are lined and interlined for lushness...
And the header on them is a nice clean cartridge pleat (actually, no pleating at all) for a more modern look. The image below is taken with them hanging on a rod next to some woven wood shades. Without the valances, they can go in any decor.
Measurements -- The long valance is 90"W x 15"L. (my window is 63"w). The shorter valance is 46"W x 15"L (my window is 37"w). The length of the drapes is a standard 84".
They were done three years ago, with a price tag of about $1,500. I'm asking $450 for all if, or if someone is wanting just the drapes, $350, or make me an offer on what you might want. I can break it all up if necessary. Oh, and you can see from the trim that it is raspberry, cream, blue green, a smidge of olive green, and beigey gold -- very current, yet classic colors. Shipping will be additional, but if you are local (Massachusetts or Rhode Island, we can arrange a pick up).
Don't be intimidated by the sizes. The drapes on the long window would be perfect for a slider, for example.
Email me by clicking on the little blue envelope in the green bar at the end of the post if you are interested, or just want more info. Or just email me at HouseandHomeDefined@gmail.com. They need to go to a nice home!! Maybe to your friend's house, or your mother's?
Thanks for reading and talk to you soon,
Carol
Sunday, November 6, 2011
What A Difference A Drape Makes
You know I am a window treatment nut. (If you were reading this blog in its former life as Sofas & Sage, you know what I'm talking about.) Anyway, I just installed drapes and roman shades in a single guy's beautiful home. He needed the space warmed up. I think he got it.
Here is the tv and music room off the kitchen before (okay, the phone pictures are really bad)...
Add some drapes and roman shades and this is what happens...
Another view...
Now...
The fabric on the drapes is Fabricut (If I remember it right) and the romans are Calvin Klein for Kravet. The fabric is called Crinkle and it has the most fantastic texture, all of which is lost in these images. :(
The room was so hard to photograph as it was very bright, and I had about two minutes to do it. The room still has a way to go, but it's coming. Accessories and pillows are on their way. What a difference a drape (or a day) makes, don't you think?
About House and Home Defined, you'll be seeing changes to the design as I go along. Just too much for me to tackle all at once. My "Who I'm Reading" blog list on the left is in the process of being restored from Sofas & Sage, but I couldn't bring my Followers with me. What a bummer. So, if you are new to House and Home Defined, or coming over from Sofas & Sage, please consider becoming a Follower? Thanks so much.
Talk to you soon, Carol
Here is the tv and music room off the kitchen before (okay, the phone pictures are really bad)...
Add some drapes and roman shades and this is what happens...
Another view...
Now...
The fabric on the drapes is Fabricut (If I remember it right) and the romans are Calvin Klein for Kravet. The fabric is called Crinkle and it has the most fantastic texture, all of which is lost in these images. :(
The room was so hard to photograph as it was very bright, and I had about two minutes to do it. The room still has a way to go, but it's coming. Accessories and pillows are on their way. What a difference a drape (or a day) makes, don't you think?
About House and Home Defined, you'll be seeing changes to the design as I go along. Just too much for me to tackle all at once. My "Who I'm Reading" blog list on the left is in the process of being restored from Sofas & Sage, but I couldn't bring my Followers with me. What a bummer. So, if you are new to House and Home Defined, or coming over from Sofas & Sage, please consider becoming a Follower? Thanks so much.
Talk to you soon, Carol
Tuesday, June 14, 2011
Window Wednesday: An updated Tudor
A few weeks back I posted that I was at a client's house measuring for dining room window treatments, and showed part of their family room here. I thought you'd like to see what we're considering for the drapes and roman shade.
First, here are the windows up for a new look. Is this the most gorgeous molding ever? The homeowner and his buddy did it themselves. Impressive.
Now, a look at the plan I'm proposing. The bump-out window will be dressed in a Roman shade in a flax-colored linen with a slate blue crewel pattern. It will be "held up" by straps of a flat braid Robert Allen trim. The crewel linen is a gorgeous-in-person Telafina fabric. I am in love with this one, people. I wish you could see the quality of it. The windows will wear drapery panels, done in a blocked design of a solid flax linen on the top portion and the crewel linen as a bottom boarder, divided by the same braid, and starting at the window sill height. (Sounds like I'm describing the red carpet, doesn't it, lol? Well, this room deserves that kind of treatment.) The goal is a relaxed formality, and I believe this achieves that look.
First, here on the fabrics. I promise they are dead-on coordinated in person. The lighting was weird today, and the colors are a bit off, but you get the idea...
Here are the sketches of what it will look like all done-up. My scanner was cranky and low on ink, so the second image is a bit more lame than the first. (Work with me, it's late at night as I post!)
Hmm. These sketches don't look that great, but this is all I've got in me tonight! The end result, though, I can't wait to show you. Different treatments in the same room, you might be asking? Read my thoughts about that here.
Oh, and please remember...
If you would like me to solve a window issue, suggest a treatment, critique what you have, or anything window related, please send me an email and picture to SofasandSage@gmail.com. The only requirements are that you 1. Become a Follower in the right hand column, or let me know that you already are, and 2. Leave a comment on this post.
What are you putting on your windows these days?
Talk to you soon,
Carol
First, here are the windows up for a new look. Is this the most gorgeous molding ever? The homeowner and his buddy did it themselves. Impressive.
Now, a look at the plan I'm proposing. The bump-out window will be dressed in a Roman shade in a flax-colored linen with a slate blue crewel pattern. It will be "held up" by straps of a flat braid Robert Allen trim. The crewel linen is a gorgeous-in-person Telafina fabric. I am in love with this one, people. I wish you could see the quality of it. The windows will wear drapery panels, done in a blocked design of a solid flax linen on the top portion and the crewel linen as a bottom boarder, divided by the same braid, and starting at the window sill height. (Sounds like I'm describing the red carpet, doesn't it, lol? Well, this room deserves that kind of treatment.) The goal is a relaxed formality, and I believe this achieves that look.
First, here on the fabrics. I promise they are dead-on coordinated in person. The lighting was weird today, and the colors are a bit off, but you get the idea...
Here are the sketches of what it will look like all done-up. My scanner was cranky and low on ink, so the second image is a bit more lame than the first. (Work with me, it's late at night as I post!)
Hmm. These sketches don't look that great, but this is all I've got in me tonight! The end result, though, I can't wait to show you. Different treatments in the same room, you might be asking? Read my thoughts about that here.
Oh, and please remember...
If you would like me to solve a window issue, suggest a treatment, critique what you have, or anything window related, please send me an email and picture to SofasandSage@gmail.com. The only requirements are that you 1. Become a Follower in the right hand column, or let me know that you already are, and 2. Leave a comment on this post.
What are you putting on your windows these days?
Talk to you soon,
Carol
Let's work together for the home you've always wanted. Email at SofasandSage@gmail.com
Tuesday, May 31, 2011
Window Wednesday: First Update
So you know how when you're a kid, and you see your teacher in the store, and you can't wrap your head around it because your teacher doesn't have a real life...she's your teacher? Well, that's sort of what it felt like stopping by to visit with Steve from An Urban Cottage. Blogger and husband meet Blogger. And see the house. Fun, I tell you. It wasn't weird-out-of-context, but more like hanging with an old friend.
Steve was the first reader to send me pictures for my Window Wednesday series last year (see the post on Steve's dilemma here). I've loved doing the series, and hopefully, it's been helpful. Steve sent me pictures last week of his guest room progress, which looked like this when he wrote to me that he needed to solve the gap problem between casing and ceiling on his very low windows.
Remember his windows...
I suggested doing something like this, perhaps with a woven blind (I used color for highlighting purposes, not as color suggestion)...
Now, here's Steve's progress. After clearing out the room, he glazed over the wallpaper to soften it (read about that here), then he installed and painted new windows, then the window treatments, and, like usual, took an artful shot of a bit of the room as it is now...
Don't you love it? He never ceases to amaze me with his creativity or his photography! And believe me, the house is just as cool in person as it looks on his blog.
I hope you've enjoyed this update. I'm looking forward to doing more Window Wednesdays, so...
If you would like me to solve a window issue, suggest a treatment, critique what you have, or anything window related, please send me an email and picture to SofasandSage@gmail.com. The only requirements are that you 1. Become a Follower in the right hand column, or let me know that you already are, and 2. Leave a comment on this post.
Talk to you soon,
Carol
Steve was the first reader to send me pictures for my Window Wednesday series last year (see the post on Steve's dilemma here). I've loved doing the series, and hopefully, it's been helpful. Steve sent me pictures last week of his guest room progress, which looked like this when he wrote to me that he needed to solve the gap problem between casing and ceiling on his very low windows.
Remember his windows...
I suggested doing something like this, perhaps with a woven blind (I used color for highlighting purposes, not as color suggestion)...
Now, here's Steve's progress. After clearing out the room, he glazed over the wallpaper to soften it (read about that here), then he installed and painted new windows, then the window treatments, and, like usual, took an artful shot of a bit of the room as it is now...
Don't you love it? He never ceases to amaze me with his creativity or his photography! And believe me, the house is just as cool in person as it looks on his blog.
I hope you've enjoyed this update. I'm looking forward to doing more Window Wednesdays, so...
If you would like me to solve a window issue, suggest a treatment, critique what you have, or anything window related, please send me an email and picture to SofasandSage@gmail.com. The only requirements are that you 1. Become a Follower in the right hand column, or let me know that you already are, and 2. Leave a comment on this post.
Talk to you soon,
Carol
For professional help with your home, please email me at SofasandSage@gmail.com
Wednesday, February 9, 2011
Window Wednesday: Bedroom with Lots of Glass
What to do with a Master Bedroom with lots of windows and a slider? Laura, a reader and Follower, asked me this question in an email last week. She told me she and her husband are thinking about a traditional look with an organic twist when they get around to a re-do. Here is the spacious, well lit room...
A couple of things to notice: first, the bed doesn't leave much room on either side for drapes to stack between the bed and the glass of the window; and two, the walls between the slider and the flanking windows aren't wide enough to accommodate both drapes on the windows and drapes on the slider that can close for privacy and insulation. Here is another view...
To bring in an organic touch, I'm suggesting woven wood blinds with fabric (usually a solid twill tape)
along the edges for a crisp outline. Then, to talk to the traditional elements, I would use an organic, textured linen for operable drapes that can be closed at night on the slider. I drew in an iron bed with a curved line to offset the clean wood lines of the furniture and put a sunburst mirror on the wall to also help soften the hard lines. Here it is...
This is only one of several directions this blank slate can go in, depending on what bed is purchased, and what happens to the furniture layout and the bedding choices. The color palette in this room needs some unifying, too. I colored in the window treatments for effect, not really for color suggestion (except for the bit of brown for woven wood shades). If you look at this last image and think, "ooh, but that looks a little cold with just shades," I would agree. And I would add that the reason for it is the stark contrast between the paint and the bedding and chair, etc. But picture it, if you can, with textured cream bedding and fluffy layered pillows, tan trim on the blinds, the palest beige textured drapes and a dark wood rod to match the wood furniture. And then, perhaps, a crisp cream slipcover on the chair with a beautiful pillow with some beige, cream and blue. Peaceful. Textured. Yum.
This, my friends, is where design comes in. Magic rarely happens from changing just one element. Like a symphony, all the pieces must play together, and that's where the fun starts.
I hope you got something out of this week's windows. Thanks, Laura, for sharing your room.
Talk to you soon,
Carol
If you would like me to solve a window issue, suggest a treatment, critique what you have, or anything window related, please send me an email and picture to SofasandSage@gmail.com. The only requirement is that you 1. Become a Follower in the right hand column, or let me know that you already are, and 2. Leave a comment on a Window Wednesday post.
A couple of things to notice: first, the bed doesn't leave much room on either side for drapes to stack between the bed and the glass of the window; and two, the walls between the slider and the flanking windows aren't wide enough to accommodate both drapes on the windows and drapes on the slider that can close for privacy and insulation. Here is another view...
To bring in an organic touch, I'm suggesting woven wood blinds with fabric (usually a solid twill tape)
along the edges for a crisp outline. Then, to talk to the traditional elements, I would use an organic, textured linen for operable drapes that can be closed at night on the slider. I drew in an iron bed with a curved line to offset the clean wood lines of the furniture and put a sunburst mirror on the wall to also help soften the hard lines. Here it is...
This is only one of several directions this blank slate can go in, depending on what bed is purchased, and what happens to the furniture layout and the bedding choices. The color palette in this room needs some unifying, too. I colored in the window treatments for effect, not really for color suggestion (except for the bit of brown for woven wood shades). If you look at this last image and think, "ooh, but that looks a little cold with just shades," I would agree. And I would add that the reason for it is the stark contrast between the paint and the bedding and chair, etc. But picture it, if you can, with textured cream bedding and fluffy layered pillows, tan trim on the blinds, the palest beige textured drapes and a dark wood rod to match the wood furniture. And then, perhaps, a crisp cream slipcover on the chair with a beautiful pillow with some beige, cream and blue. Peaceful. Textured. Yum.
This, my friends, is where design comes in. Magic rarely happens from changing just one element. Like a symphony, all the pieces must play together, and that's where the fun starts.
I hope you got something out of this week's windows. Thanks, Laura, for sharing your room.
Talk to you soon,
Carol
If you would like me to solve a window issue, suggest a treatment, critique what you have, or anything window related, please send me an email and picture to SofasandSage@gmail.com. The only requirement is that you 1. Become a Follower in the right hand column, or let me know that you already are, and 2. Leave a comment on a Window Wednesday post.
Wednesday, February 2, 2011
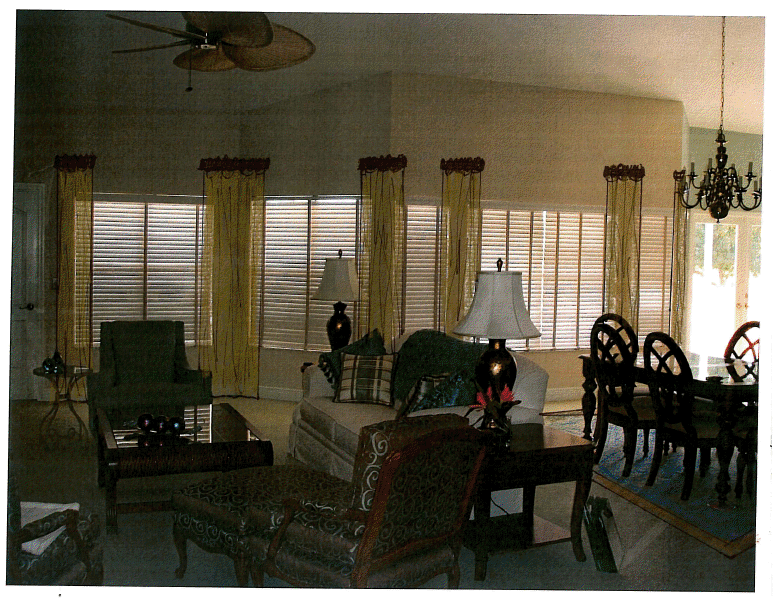
Window Wednesday:A Long Stretch of Windows
My reader Carol, whose first window I did here, sent me another challenge. This room is in need of some serious fabric warmth on the windows.
This is a Florida home, and all of those windows look out onto a gorgeous pool. Carol hates the vertical tape on the blinds, but I actually like it because it breaks up all those horizontal lines, and yet it is neutral. Perfect. So, what to do with that enormous expanse? I say pour the budget into panels.
There are connectors, called elbows (like in plumbing) that will allow you to take drapery around a corner if you do not have the tools or talent to miter-cut two rods. I have put several short rods into this picture for two reasons: 1. another strong horizontal line would only accentuate what's already there, and 2. it looks to me to be a bit more contemporary as is befitting the bones of the windows. I'm suggesting dark rods to coordinate with the furniture so as to carry that heavy color up and tie the whole room together.
What of the gap between window casing and ceiling? As it is so dramatic, I would only take the drapes a third of the way up. Half-way would cut the space in two, not good, and higher than that, I believe, would just look like Carol was trying too hard to fix it.
For fabric, a textured neutral, similar to the wall color, will provide dimension to the windows, but not highlight all of them the way using a patterned fabric would. Lastly, I would do this...
By adding a rug to define at least one of the two distinct areas, the eye is fooled into seeing two different spaces, helping, again, to break up the long line of windows.
I hope you've enjoyed this week's challenge.
Talk to you soon, and for those of you, like me, who are snowed under (again!), stay warm and safe my friends!
Carol
If you would like me to solve a window issue, suggest a treatment, critique what you have, or anything window related, please send me an email and picture to SofasandSage@gmail.com. The only requirement is that you 1. Become a Follower in the right hand column, or let me know that you already are, and 2. Leave a comment on a Window Wednesday post.
This is a Florida home, and all of those windows look out onto a gorgeous pool. Carol hates the vertical tape on the blinds, but I actually like it because it breaks up all those horizontal lines, and yet it is neutral. Perfect. So, what to do with that enormous expanse? I say pour the budget into panels.
There are connectors, called elbows (like in plumbing) that will allow you to take drapery around a corner if you do not have the tools or talent to miter-cut two rods. I have put several short rods into this picture for two reasons: 1. another strong horizontal line would only accentuate what's already there, and 2. it looks to me to be a bit more contemporary as is befitting the bones of the windows. I'm suggesting dark rods to coordinate with the furniture so as to carry that heavy color up and tie the whole room together.
What of the gap between window casing and ceiling? As it is so dramatic, I would only take the drapes a third of the way up. Half-way would cut the space in two, not good, and higher than that, I believe, would just look like Carol was trying too hard to fix it.
For fabric, a textured neutral, similar to the wall color, will provide dimension to the windows, but not highlight all of them the way using a patterned fabric would. Lastly, I would do this...
By adding a rug to define at least one of the two distinct areas, the eye is fooled into seeing two different spaces, helping, again, to break up the long line of windows.
I hope you've enjoyed this week's challenge.
Talk to you soon, and for those of you, like me, who are snowed under (again!), stay warm and safe my friends!
Carol
If you would like me to solve a window issue, suggest a treatment, critique what you have, or anything window related, please send me an email and picture to SofasandSage@gmail.com. The only requirement is that you 1. Become a Follower in the right hand column, or let me know that you already are, and 2. Leave a comment on a Window Wednesday post.
Tuesday, January 4, 2011
Window Wednesday: What Builders Don't Consider
New Year, new windows...Christine sent me this picture with a screaming HELP next to it! I shook my head. Yikes. I wish builders would consider the reality of beautiful windows like this when they plan to install them.
(Please pardon photo quality this time around. I couldn't properly grab the photos off Christine's email. What look like gray walls on either side of the wall of windows is actually the frame of the image, and cropping wasn't helping).
Anyway, this lovely reader explained to me that a friend had made her four rod-pocket panels, but she didn't know what to do with them, and wanted to use them for some privacy as well as to soften this wall. Could I make a suggestion? Well... as you can all see, this baby is a charmer! Wow.
Here's a look at how I would hang these available panels if someone were twisting my arm and told me I had no choice but to do it...
Okay, really, I'm sitting here at the computer barely breathing because I can't believe I posted this picture, above. Wrong, I tell you, wrong, wrong, wrong. Please, Christine, take no offense, but in my professional opinion, this would be, well, all wrong. It will ruin what I am sure is a beautiful room.
The way these windows are configured, to address only the bottom windows means visually cutting the entire wall in half. You'll see on the "rod" I've put in some star-looking blobs, which are meant to show you where the brackets would need to be placed. With rod pocket drapes (hung on rings with clips instead to allow easy movement), at a single fabric width, the panels will sort of look like flattish shower curtains when closed (I used 2 panels in the center here so that they can be pulled closed in opposite directions.) If this is the way it must be (please say no), I would use a single panel in the middle, never close them, and install white wood blinds to use for privacy when needed (shown here in brown so you can see them).
Inquiring minds may be asking, "why not take out the center panels and just double up on each side?" Good question, but, wrong again. Sorry! The brackets will never allow for closure, and the width of two panels on each side will cover too much of the glass, leaving all the other exposed windows in a weird configuration of glass (try to picture it). Single width panels on the bottom sides would look far too skimpy for the scale of this wall.
So, here's my best recommendation...
I think it's critical to balance the differing heights of these windows with fabric that works with them and brings the eye up. The panels would be hung on half-rods on the flat section of casing (which you can't really see from these images, but it's a nice surface on which to mount). This achieves the height and softness needed. Privacy comes from shades -- fabric romans, woven woods, or maybe even white wood blinds -- It all depends on what else is going on in the room regarding color, texture, etc. With the design above, I believe a comfortable rhythm of fabric/shades is achieved.
Do tell, am I too harsh this week? I worry about that! But, here's the thing. I love doing windows as much as I love any part of design, and knowing a thing or two about it, I'm figuring if you guys ask for help, I need to be honest. It's that simple. Why else would you write to me, yes?
I hope you've learned something from this week's challenge. Good luck, Christine. And to all of you out there building homes with unique and beautiful windows, my best advice is to consult a good designer first!
Talk to you soon,
Carol
If you would like me to solve a window issue, suggest a treatment, critique what you have, or anything window related, please send me an email and picture to SofasandSage@gmail.com. The only requirement is that you 1. Become a Follower in the right hand column, or let me know that you already are, and 2. Leave a comment on a Window Wednesday post.
(Please pardon photo quality this time around. I couldn't properly grab the photos off Christine's email. What look like gray walls on either side of the wall of windows is actually the frame of the image, and cropping wasn't helping).
Anyway, this lovely reader explained to me that a friend had made her four rod-pocket panels, but she didn't know what to do with them, and wanted to use them for some privacy as well as to soften this wall. Could I make a suggestion? Well... as you can all see, this baby is a charmer! Wow.
Here's a look at how I would hang these available panels if someone were twisting my arm and told me I had no choice but to do it...
Okay, really, I'm sitting here at the computer barely breathing because I can't believe I posted this picture, above. Wrong, I tell you, wrong, wrong, wrong. Please, Christine, take no offense, but in my professional opinion, this would be, well, all wrong. It will ruin what I am sure is a beautiful room.
The way these windows are configured, to address only the bottom windows means visually cutting the entire wall in half. You'll see on the "rod" I've put in some star-looking blobs, which are meant to show you where the brackets would need to be placed. With rod pocket drapes (hung on rings with clips instead to allow easy movement), at a single fabric width, the panels will sort of look like flattish shower curtains when closed (I used 2 panels in the center here so that they can be pulled closed in opposite directions.) If this is the way it must be (please say no), I would use a single panel in the middle, never close them, and install white wood blinds to use for privacy when needed (shown here in brown so you can see them).
Inquiring minds may be asking, "why not take out the center panels and just double up on each side?" Good question, but, wrong again. Sorry! The brackets will never allow for closure, and the width of two panels on each side will cover too much of the glass, leaving all the other exposed windows in a weird configuration of glass (try to picture it). Single width panels on the bottom sides would look far too skimpy for the scale of this wall.
So, here's my best recommendation...
I think it's critical to balance the differing heights of these windows with fabric that works with them and brings the eye up. The panels would be hung on half-rods on the flat section of casing (which you can't really see from these images, but it's a nice surface on which to mount). This achieves the height and softness needed. Privacy comes from shades -- fabric romans, woven woods, or maybe even white wood blinds -- It all depends on what else is going on in the room regarding color, texture, etc. With the design above, I believe a comfortable rhythm of fabric/shades is achieved.
Do tell, am I too harsh this week? I worry about that! But, here's the thing. I love doing windows as much as I love any part of design, and knowing a thing or two about it, I'm figuring if you guys ask for help, I need to be honest. It's that simple. Why else would you write to me, yes?
I hope you've learned something from this week's challenge. Good luck, Christine. And to all of you out there building homes with unique and beautiful windows, my best advice is to consult a good designer first!
Talk to you soon,
Carol
If you would like me to solve a window issue, suggest a treatment, critique what you have, or anything window related, please send me an email and picture to SofasandSage@gmail.com. The only requirement is that you 1. Become a Follower in the right hand column, or let me know that you already are, and 2. Leave a comment on a Window Wednesday post.
Subscribe to:
Posts (Atom)